

A cast stone fountain becomes simpler to plan when cost, construction time, and delivery are viewed as components of an integrated whole. In a typical installation example, the assembly itself takes one day, in addition …
How to Plan Price, Construction Time, and Delivery for a Cast Stone Fountain
28 Οκτ 2026
A cast stone fountain becomes simpler to plan when cost, construction time, and delivery are viewed as components of an integrated whole. In a typical installation example, the assembly itself takes one day, in addition to the drying time for paint and joints. The price of an individual fountain depends on the model and the specific parameters of the project and is provided upon request for a quotation.
While it is easy to focus primarily on the fountain's form and aesthetic expression, site dimensions, ground conditions, and access routes to the installation area also influence the planning process. When the practical prerequisites are thoroughly considered, integrating the fountain seamlessly into the garden's architectural framework becomes effortless.
Here you will learn which factors determine costs and construction schedules, how to prepare the site, and what logistics to arrange regarding transport and freight. This enables you to balance craftsmanship, logistics, and spatial design before establishing the fountain as a lasting feature of your outdoor environment.
Key Takeaways
- Factor in the model, choice of materials, and site conditions when planning your budget.
- Compare material qualities and characteristics based on how the fountain will harmonize with the garden's architecture.
- Prepare a stable, level base and map out pump and plumbing routing prior to installation.
- Account for the fountain's head height and water flow when selecting a pump, and plan for routine cleaning.
- Measure the transport path to the designated location so that delivery and handling can be coordinated well in advance.
Construction Time and Cost
- Begin by separating the fountain assembly from site and foundation preparation. For example, assembling a prefabricated fountain on an already stable foundation may take a single day, apart from the curing and drying times for finishes and joint seals. If the project requires pouring a new concrete slab, ground preparation and curing time must be added. Concrete requires an average of 21 days to reach full cure. Plan the workflow systematically: establish the placement, complete the sub-base, and coordinate assembly in line with the curing process.
- Account for the model, dimensions, detailing, and ground conditions when establishing your budget. A multi-tiered sculptural fountain requires different handling than a smaller, minimalist model. The condition of the ground also affects labor: an existing, level surface demands far less preparation than an uneven or soft garden grade. Pricing depends on design specifications and is determined via quotation, shaped by the fountain's complexity, foundational groundwork, and freight handling.
- Evaluate building permit requirements based on the scope of the installation and its exact placement. A freestanding water feature differs from an installation integrated with retaining walls or substantial grading changes. Clearly define the extent of civil works and structural layout when assessing permitting needs. Document whether the fountain will rest on existing grade, a slab, or an elevated masonry structure to facilitate regulatory assessment.
- Select a solid, level site prior to delivery. The foundation must support the structural load without settling or tilting, and the location should function harmoniously in relation to walkways, plantings, and water splash. Check soil compaction and surface drainage carefully. Trapped water that freezes can expand and cause frost damage (frostsprängning) to materials. Store removable components in frost-protected areas over winter, and drain basins and plumbing before freezing temperatures arrive. Follow pump guidelines for decommissioning to ensure no water remains in the system.
- Plan for moisture management and electrical infrastructure before filling the reservoir. A leak can saturate the sub-base and compromise stability, while moisture near electrical components introduces serious safety hazards. Install pump connections in accordance with manufacturer specifications and route hoses to prevent pinching or abrasion. Once assembled, fill the basin incrementally to inspect seals and connections, identifying any drops in water level before finishing surrounding landscape surfaces.
Keep the material purchase cost distinct from site preparation, foundation, delivery, and assembly expenses, as these vary according to project scope. This breakdown clarifies what the core purchase encompasses and identifies details that need resolving before requesting a quote. Describing the fountain specifications and ground conditions uniformly in your tender inquiries ensures meaningful, like-for-like comparisons.
In the project schedule, the assembly itself can be treated as a defined phase: it typically takes one day, beyond the drying time required for sealants and coatings. Allocate separate allowances for site preparation and concrete curing where applicable. Documenting when groundworks are ready, when assembly can commence, and scheduling curing windows ensures project clarity without underestimating the necessary preparation phases.
How Does Cast Stone Differ from Natural Stone and Concrete in Fountains?
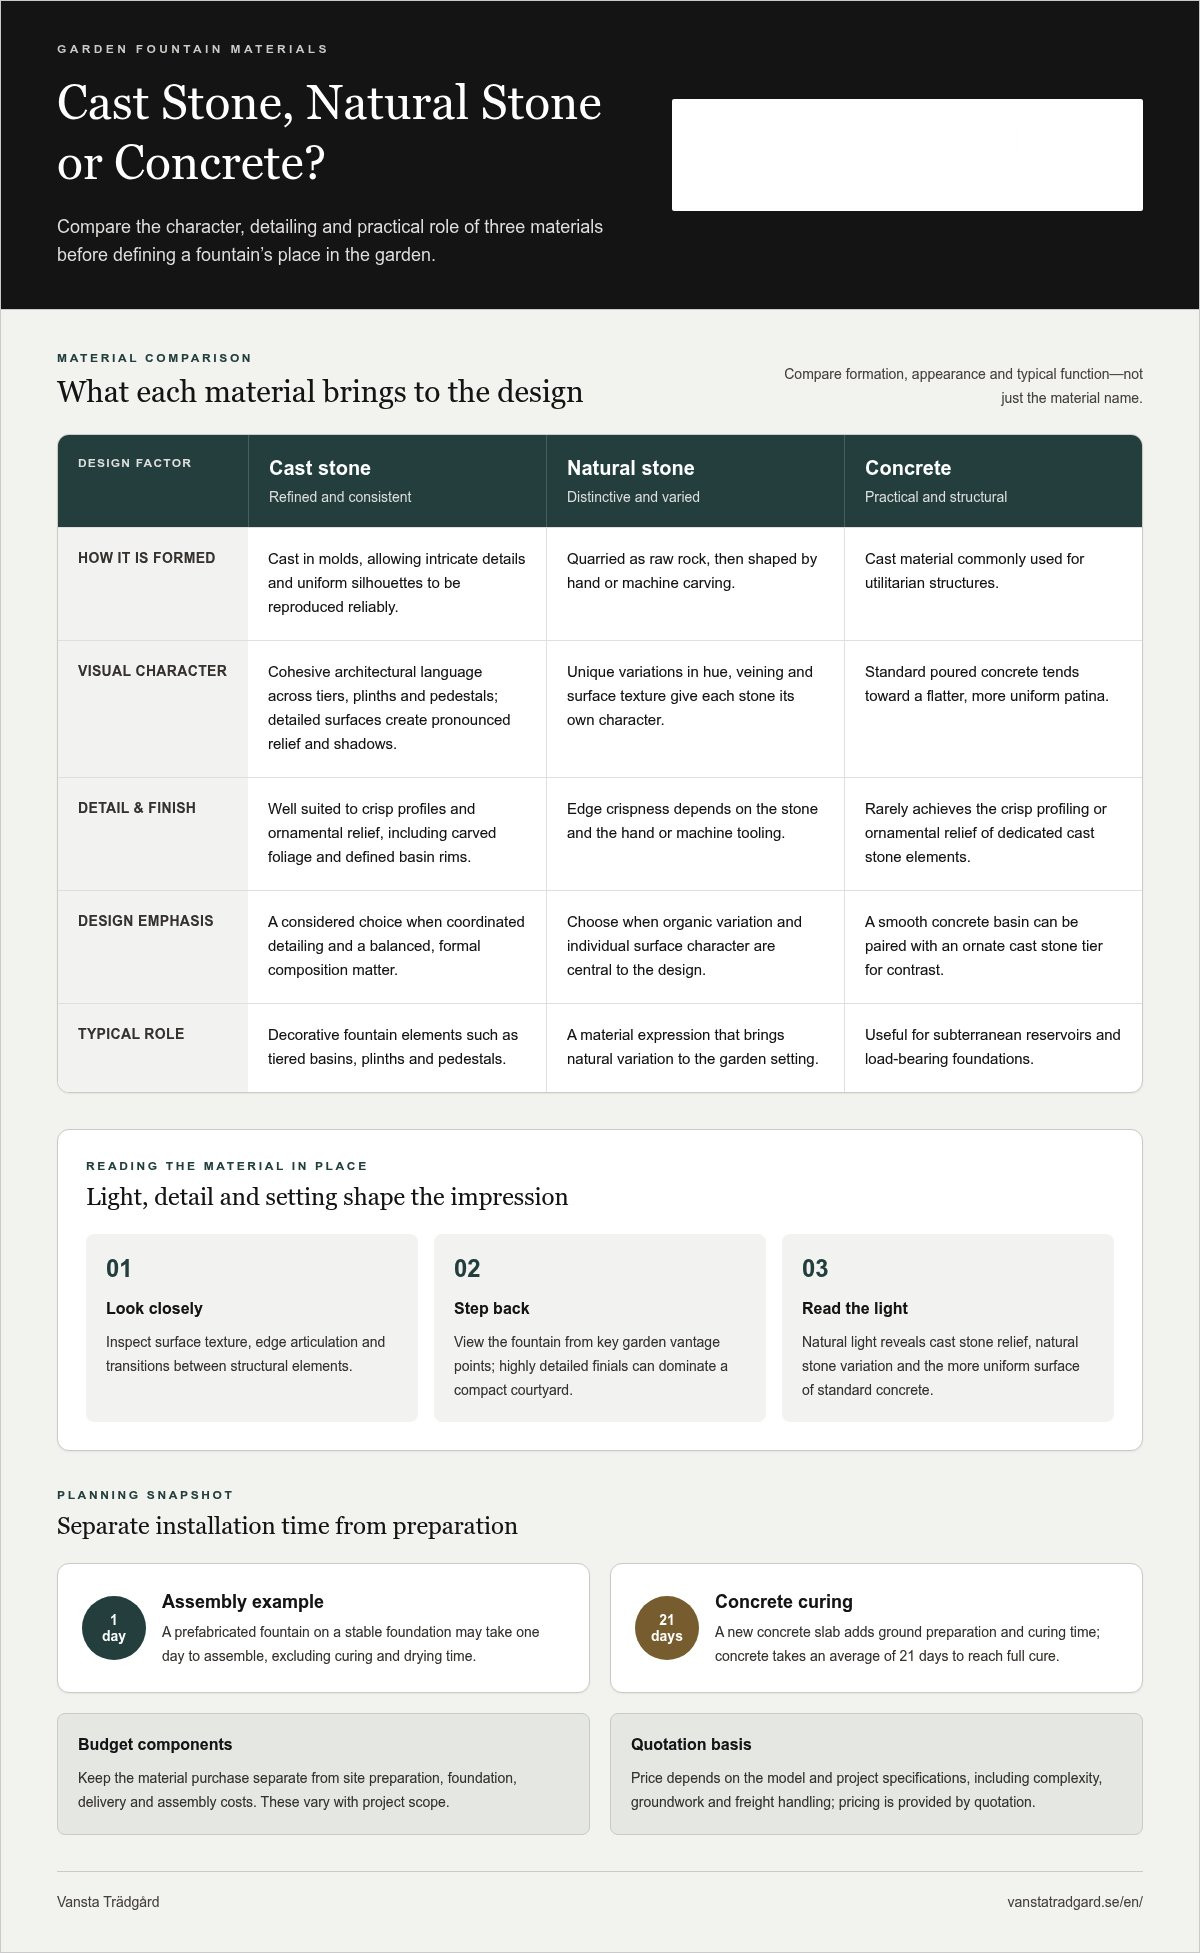
- Begin by comparing how each material is formed. Cast stone is manufactured by casting in molds, allowing intricate details to be replicated reliably with uniform silhouettes. Natural stone is shaped through quarrying and hand- or machine-carving raw rock. Concrete is likewise cast, but is commonly utilized for utilitarian structures. A classic tiered basin fountain with symmetrical mouldings demonstrates how cast stone captures refined decorative elements with absolute consistency.
- Select natural stone when unique variations in hue, veining, and surface texture are essential to your design. Each quarry block carries distinct character, and hand tooling dictates edge crispness. Cast stone, by contrast, offers cohesive architectural language across tiers, plinths, and pedestals. In formal landscapes with axial paths, this uniformity establishes a balanced architectural anchor, whereas natural stone excels when organic, varied textures take precedence.
- Assess concrete primarily through the lenses of function and structural performance. While ideal for subterranean reservoirs and load-bearing foundations, standard poured concrete rarely achieves the crisp profiling or ornamental relief found in dedicated cast stone elements. Examine surface texture, edge articulation, and structural transitions rather than relying solely on material labels. A smooth concrete basin, for instance, can be paired with an ornate cast stone tier to balance restraint with classical refinement.
- Observe material surfaces under natural garden light. Cast stone creates deep relief and pronounced shadows around foliate carvings, mascarons, and basin rims. Natural stone exhibits organic mineral variations, whereas standard concrete displays a flatter, uniform patina. Evaluate the feature up close as well as from key vantage points. Highly detailed finials add elegance near a seating terrace, but may visually dominate a compact courtyard.
- Factor in climate durability and maintenance routines when evaluating materials. Retained water that freezes can cause frost cracking, especially where fissures or unsealed joints exist. Regardless of material, basins must be drained prior to winter, and surfaces kept free of organic buildup that obscures carved motifs. Ensure structural interfaces are stable and water flow is calibrated smoothly; selecting the right material is as much an architectural decision as a practical investment in longevity.
A meaningful comparison becomes evident when structural dimensions and mechanical designs are evaluated together. In one described installation, a concrete rim measures 25 cm in height with an outer diameter of 80 cm. These dimensions dictate how the surround relates visually to the fountain bowl and surrounding paving. Concrete elements can serve as grounding structures within compositions where sculpted tiers provide artistic focus. Evaluate proportions and interfaces directly on site, particularly where water circulates or overflows.
Plumbing concealment equally impacts the visual refinement of the installation. In one refined application, plastic conduits were replaced with rigid copper piping to eliminate unsightly hoses draped over coping stones. Aesthetic success extends beyond the material's surface; visible infrastructure disrupts an architectural silhouette regardless of how skillfully the bowl is cast. When assessing cast stone, natural stone, and concrete, verify that pipework integrates discreetly. A disciplined junction between base, basin, and plumbing ensures the fountain functions as an integrated architectural element rather than an ad-hoc garden fixture.
How Do You Install a Cast Stone Fountain?
- Establish the fountain's precise location and outline the slab dimensions. Confirm sightlines from the residence and verify unhindered access to pump chambers. Assess site slope and surface runoff patterns. If positioning near walkways, ensure splashing will not create slip hazards. Clearly map supply routes for water, electricity, and submersible lighting prior to excavation.
- Construct a robust, load-bearing sub-base in distinct layers. A dependable installation base comprises 6 inches of compacted crushed gravel topped with 2 inches of rigid foam insulation, extending at least 12 inches beyond the slab perimeter. Adapt these parameters to specific fountain loads and local geotechnical profiles. Compact the aggregate evenly and check levels thoroughly before laying insulation.
- Plan all mechanical penetrations before pouring concrete. A standard engineered fountain slab incorporates three penetrations for water supply, pump power, and illumination conduits. Position these 2 inches below the top edge of the concrete, using 3/4-inch brass pipe sleeves. Keep all openings free of debris and concrete slurry. Careful conduit placement guarantees seamless utility runs without surface-routed hoses.
- Pour the foundation slab once all sleeves are anchored securely. Specifications typically require 4,000 PSI concrete reinforced with Fibermesh additives, alongside a drainage sump recessed at least 1 inch below finished grade. Allow the concrete to cure for a minimum of 7 days before sealing penetrations and drain fittings. Full curing averages 21 days; schedule fountain assembly with these structural milestones in mind.
- Assemble the pool surround and fountain components on a level, structurally sound surface. For masonry basins, the interior can be waterproofed with a pond liner while the exterior receives a rendered plaster finish. Heavy cast elements are secured onto masonry footings built directly on the reinforced slab. Route internal plumbing so fittings remain hidden, utilizing rigid copper pipework instead of flexible PVC for a polished, durable finish.
- Fill the reservoir incrementally to inspect gaskets, joints, and static water levels. Confirm that circulation operates without loss and that all tiers stand plumb and true. In multi-stage builds—such as a masonry basin lined internally and rendered externally—testing mechanicals before completing surrounding landscaping allows for swift adjustment of flow rates and prompt remediation of any seepage.
What Pump and Capacity Are Needed for a Cast Stone Fountain?
- Begin by calculating total head height, measured from the surface of the reservoir to the fountain's highest discharge point. A suitable pump should deliver a minimum head height of 120 cm. Match this rating against the total vertical rise of the fountain rather than merely its top ornament. Water must arrive with sufficient pressure to generate the desired volume; an undersized unit will result in anemic, uneven spillover.
- Evaluate pump capacity alongside discharge nozzle geometry. A focused jet and a broad perimeter weir produce vastly different visual and acoustic dynamics using identical water volumes. Review flow charts detailing volume against head height, cross-referencing them with basin geometries. The objective is a consistent curtain of water that cascades within the bowls without splashing beyond the coping. Calibrate flow rates incrementally during commissioning.
- Map the hydraulic circuit from pump intake to top discharge. Total pipe length, directional elbows, and valve restrictions induce friction loss. A direct, unobstructed vertical line to the fountainhead offers superior performance compared to convoluted routings. Ensure conduits are not compressed between heavy cast stone tiers. Match pipe diameters strictly to pump discharge specifications to prevent cavitation and motor strain.
- Tailor pump selection to tier geometry. Multi-tiered fountains require steady elevation to the upper reservoir to maintain balanced distribution as water cascades down subsequent levels. Confirm during testing that the pump maintains adequate head to supply the primary weir consistently. A steady, laminar flow preserves the visual coherence and gentle acoustics intended by the designer.
- Position the pump for convenient inspection and seasonal maintenance. Concealing a pump behind massive stone plinths without an access hatch complicates servicing. Incorporate discreet access points when routing plumbing and aligning base elements. Monitor operating water levels diligently; submersible units require full immersion to prevent overheating and premature impeller wear.
- Conduct comprehensive trial runs before finalizing surrounding hardscaping. Initiate flow at low volume, verifying that water returns cleanly to the basin without wind-induced drift or overspray. Adjust nozzle direction and throttling valves as needed. Inspect all fittings for pressure drops or water loss. Thorough commissioning ensures the pump's hydraulic performance matches the physical requirements of the fountain.
How to Clean and Maintain a Cast Stone Fountain
- Disconnect electrical power and drain the basin completely prior to maintenance. Clear leaves, airborne debris, and organic sediment using a soft-bristled brush and clean water. Clean detailed reliefs, fluting, and carved mouldings gently to avoid abrading the cast stone face. Never use wire brushes, acid-based cleaners, or aggressive pressure washers. Clearing surface deposits allows you to inspect stone joints and identify structural fissures early.
- Inspect water quality and reservoir hygiene regularly. Basins collect dust and organic matter, especially when framed by overhanging trees or herbaceous borders. Remove floating debris before it obstructs the pump intake strainer. Monitor operating depth, as summer evaporation and wind drift steadily deplete basin volume. Maintaining clear, balanced water prevents algae blooms and protects pump mechanics.
- Examine the mechanical assembly and hoses during each cleaning cycle. De-energize the pump before inspecting the intake cage and impeller housing. Ensure hoses remain securely clamped, unkinked, and free of UV degradation. Clean internal filter sponges in line with manufacturer guidelines. Upon reactivation, verify that water cascades symmetrically and returns cleanly without perimeter loss.
- Check stone bowls, architectural joints, and decorative profiles for hairline fractures or deteriorating mortar. Water migrating into unsealed fissures poses severe risks of frost damage (frostsprängning) during freeze-thaw cycles. Repair failing joint seals promptly and prevent standing water in upper tiers as seasonal temperatures drop. Regular visual audits safeguard the integrity of decorative features.
- Winterize the fountain thoroughly by draining the reservoir, internal plumbing, and bowls before the first hard freeze. Water trapped inside enclosed chambers expands, cracking cast stone and splitting valves. Remove submersible pumps for indoor storage in a frost-free environment, following product care instructions. Keep all decorative bowls dry and covered with breathable, waterproof covers throughout winter.
- Commission the system in spring only after inspecting all stone joints and replenishing the reservoir. Ensure the pump is seated properly and water intake screens are completely clean. Energize the system and observe the sheet flow across all tiers. If water tracks erratically or splashes past the coping, adjust leveling shims or fine-tune control valves. Finally, inspect the surrounding foundation to ensure no undetected subterranean seepage occurs.
Vansta Trädgård: Vansta Orangeries
Vansta Trädgård assists you in orchestrating outdoor environments where refined architecture and moving water unite into a harmonious composition. When a fountain is incorporated into a comprehensive landscape plan, aligning its placement with primary sightlines, garden axes, and surrounding greenery is paramount. Bespoke Vansta Orangeries and classic Vansta Classic glasshouses introduce an enduring architectural anchor to the estate, while an artisanal greenhouse establishes a distinct horticultural atmosphere. The selection hinges on how you wish to engage with your garden and the architectural heritage of your property. If you are envisioning a fountain as part of a broader transformation of your estate's architecture, Vansta Trädgård provides seasoned design and project management expertise. Contact Vansta Trädgård to discuss your vision.
Make the Overall Garden Your Next Step
A cast stone fountain transforms the spatial perception of a garden through sculptural presence, balanced movement, and tranquil acoustics. Envision how the feature will enhance daily living: an architectural focal point viewed through a drawing-room window, a serene water feature adjoining an entertainment terrace, or an eye-catching terminus to a garden walk. This clear spatial vision ensures your selection is deeply rooted in your home's unique setting.
Once a guiding direction is established, the next phase is to articulate these concepts into structural design. Vansta Trädgård can help you curate this architectural vision, integrating a cast stone fountain as a natural centerpiece of the landscape.
Contact Vansta Trädgård to advance your ideas and begin shaping an outdoor environment defined by timeless craftsmanship and personal elegance.
Frequently Asked Questions
What types and sizes of cast stone fountains are available?
Cast stone is suitable for classical tiered fountains with symmetrical profiles, architectural wall fountains with ornamental relief, multi-component sculptural centerpieces, and compact minimalist basin designs.
Where can you buy a cast stone fountain in Sweden?
Vansta Trädgård: Vansta Orangeries is a premier provider of high-end architectural garden features, greenhouses, and bespoke stone installations.